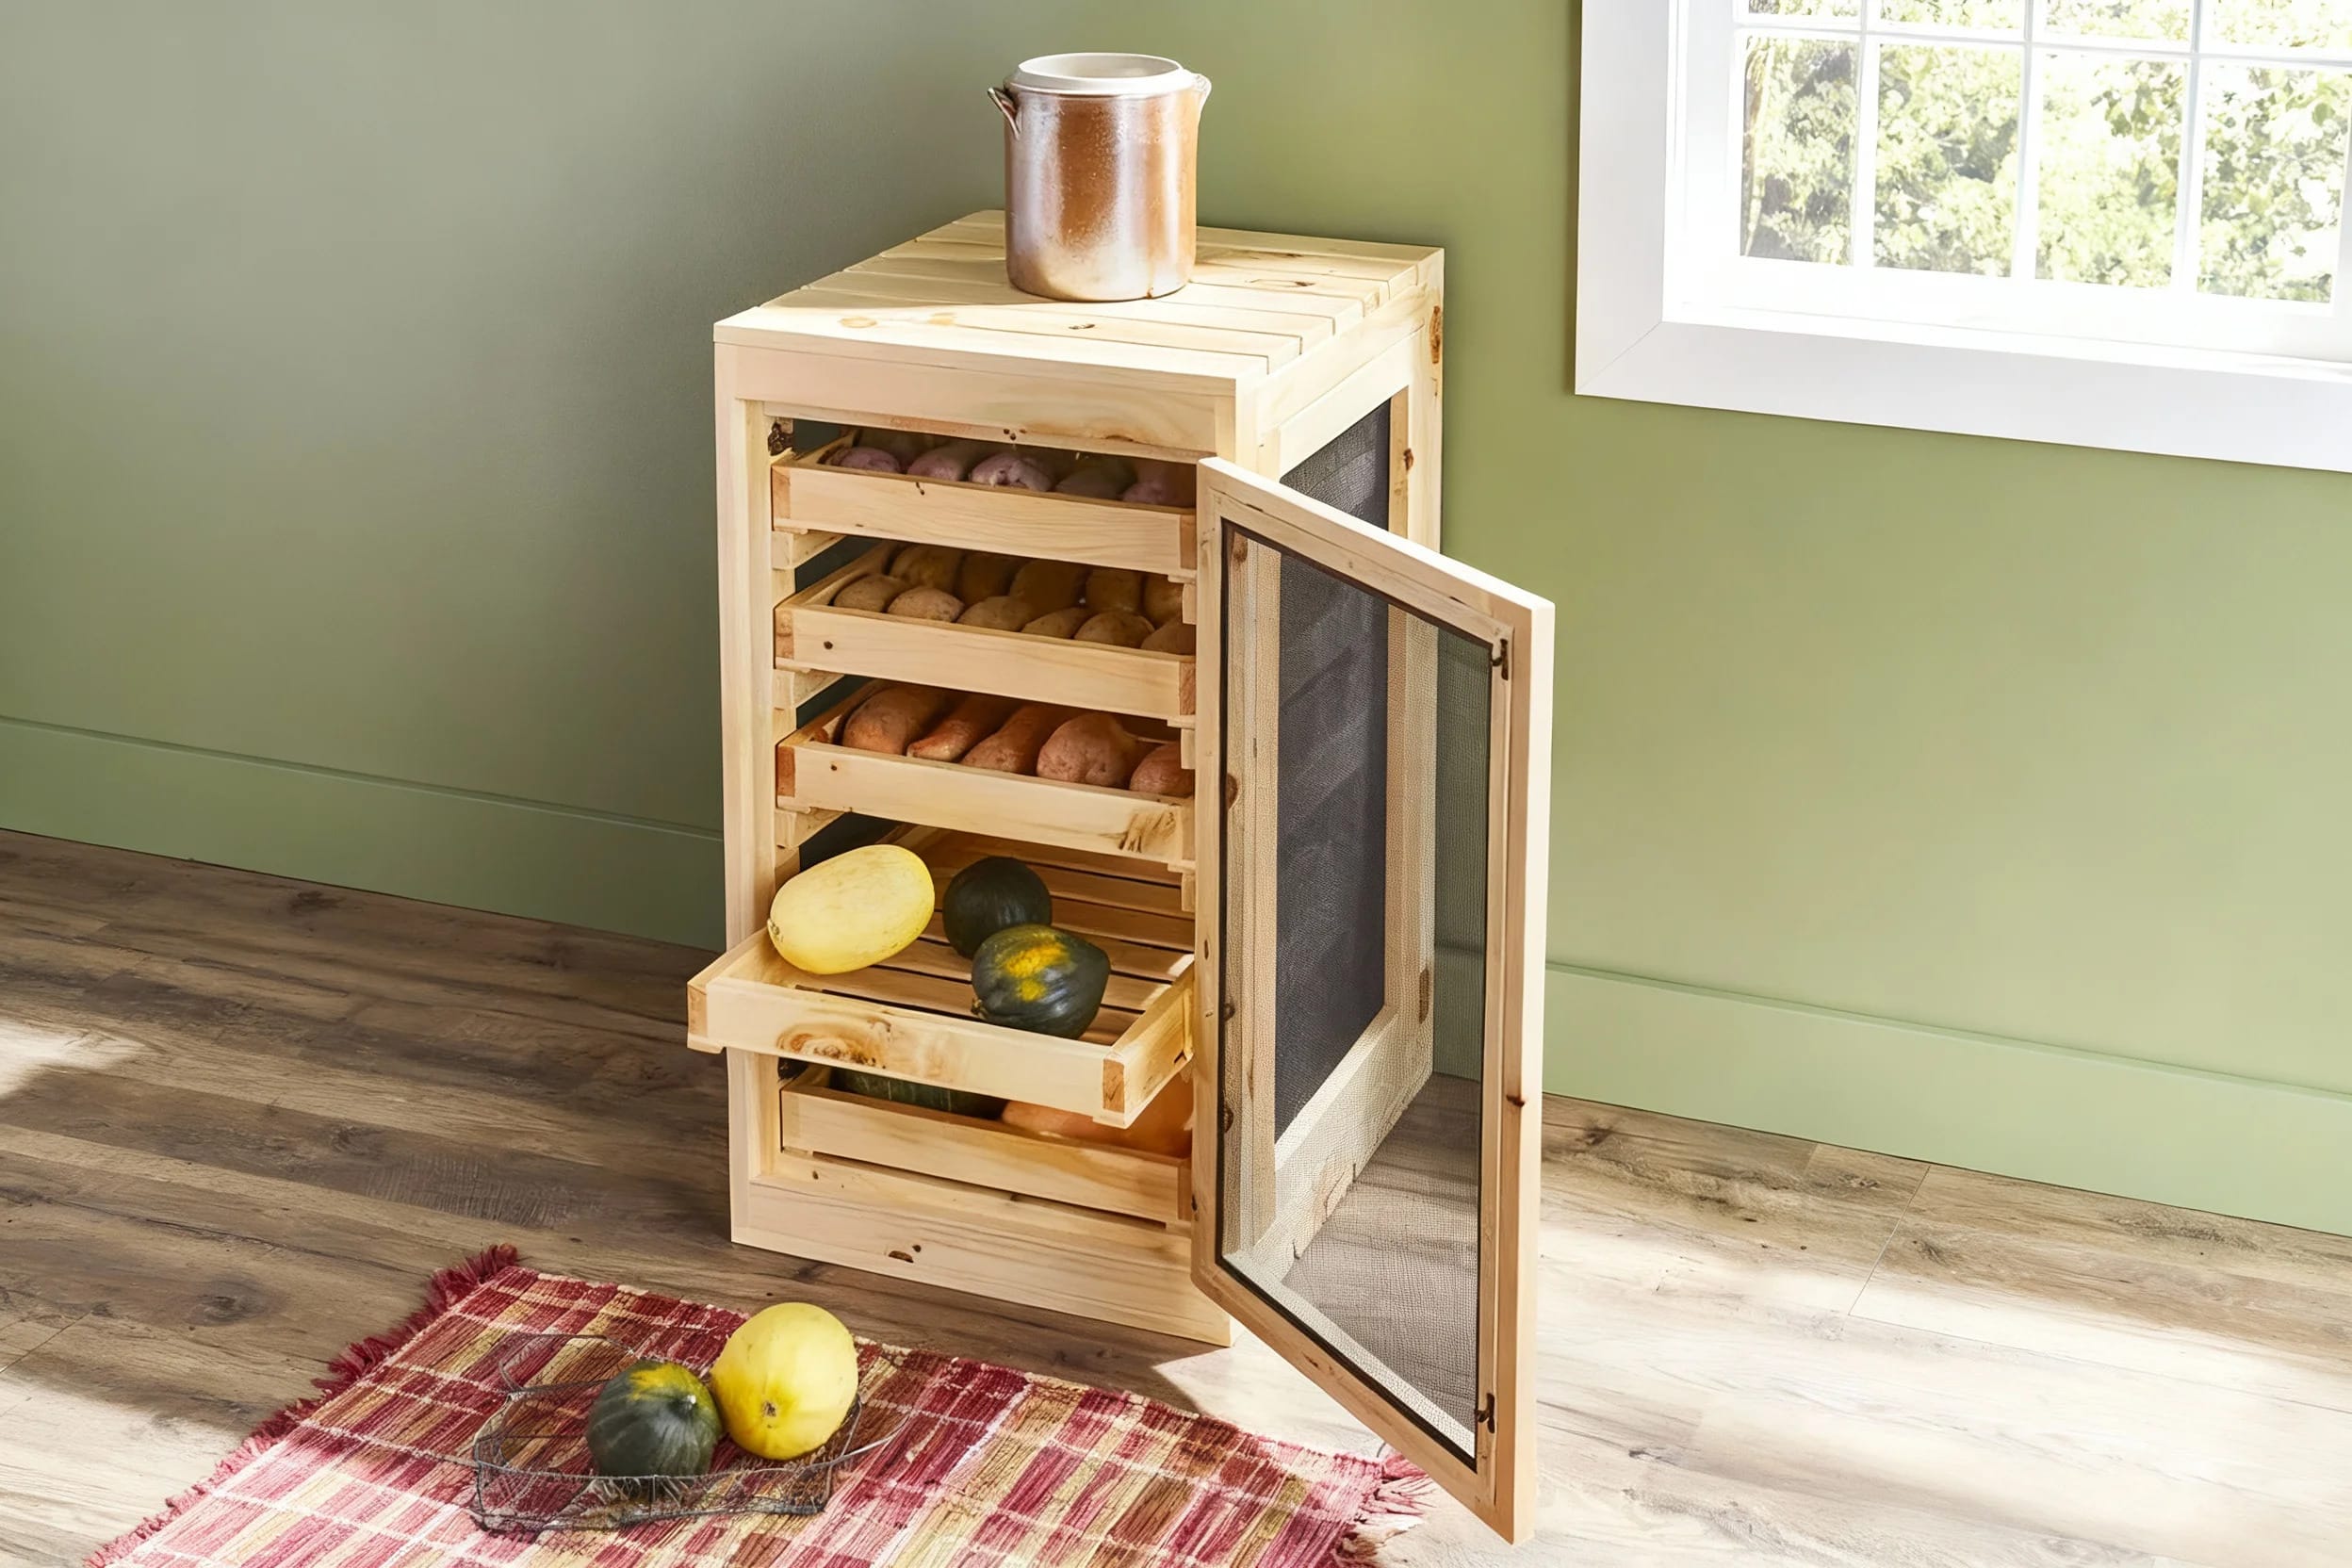
How to Build a Vegetable Bin Cupboard: A Complete Guide
Are you tired of cluttered fridges, overflowing cupboards, or messy kitchen counters? If so, a vegetable bin cupboard might be the perfect solution for you.
Not only does it provide a neat and organized storage space for your vegetables, but it also helps them stay fresh for longer.
In this guide, we will walk you through the process of building your own vegetable bin cupboard, from gathering the materials to assembling the final product.
Whether you’re a seasoned woodworker or a DIY enthusiast, this step-by-step guide will equip you with the knowledge and skills to create a practical and aesthetically pleasing vegetable storage solution.
Why Build a Vegetable Bin Cupboard?
Before we dive into the details of building a vegetable bin cupboard, let’s understand why it’s a valuable addition to your kitchen.
While there are various options for storing vegetables, including the fridge, kitchen counter, paper bags, and tiered vegetable trays, these methods often lead to clutter and disorganization.
A vegetable bin cupboard offers a dedicated space for storing your produce, keeping them easily accessible and neatly arranged.
Moreover, it helps prolong the shelf life of your vegetables by providing proper ventilation and protection from light.
Step 1: Research and Planning
Before starting any DIY project, it’s important to do thorough research and develop a solid plan.
Begin by exploring different types of vegetable bin cupboards available online or seek inspiration from family and friends.
This research phase will help you gather ideas and refine your vision for the project.
Once you have a clear idea of what you want, find or draw a plan that suits your needs.
Various websites offer free plans for vegetable bin cupboards that you can use as a reference.
Step 2: Gather the Materials and Equipment
Now that you have a plan in place, it’s time to gather all the necessary materials and equipment.
Here’s a list of items you’ll need for building a sturdy vegetable bin cupboard:
- Lumber: Choose high-quality lumber that is suitable for your project.
- Plywood: Opt for plywood that is sturdy and resistant to moisture.
- Wire mesh, door pulls, and hinges: These will be used for the drawers and doors of the cupboard.
- Drill machinery and drill bits: Essential for making holes and assembling the components.
- Mitre saw and jigsaw: Used for cutting the wood to the required lengths and sizes.
- Safety gloves and glasses: Protect yourself while working with power tools.
- Carpentry pencil, tape measure, chalk line, and a level: These tools ensure accuracy and precision during construction.
- Sandpaper: Smooth out any rough edges and prepare the wood for finishing.
- Wood stain or paint and paintbrushes: Choose a finish that complements your kitchen decor.
- Magnetic latches, nails, and screws: These will be used for securing the components together.
Step 3: Prepare the Components
Before assembling the vegetable bin cupboard, it’s important to prepare all the components.
This step will make the assembly process smoother and more efficient.
Follow these steps to prepare the components:
- Cut the wood to the required lengths and sizes as indicated in your plan.
- Use a mitre saw to make angle cuts, ensuring precise and clean edges.
- Measure, mark, and drill all the required screw holes on each wooden component.
Step 4: Assemble the Vegetable Bin Cupboard
Now that all the components are ready, it’s time to assemble the vegetable bin cupboard.
Follow these steps to ensure a successful assembly:
- Smooth the edges of all the cupboard components using sandpaper.
- Fit the cleats to the inside of the panels using glue and screws.
- Assemble the front face by drilling pocket holes at both sides of the horizontal supports and screw them onto the vertical supports. Make sure the edges are flush and the corners are square.
- Fit the front trims to the sides, ensuring a flush fit. Glue the joints and fix them with nails.
- Fit the plywood to the back of the cupboard, ensuring a flush fit, and nail the parts together.
- Fit the plywood top and secure it with nails. Glue the joints and add the trims for a finished look.
- Install the top shelf by nailing the plywood shelf to the cleats.
- Build the top drawer by aligning the edges of the drawer and joining them with nails. Apply glue to all the joints and staple the wire mesh to the frame.
- Construct the front frames for the bins by aligning the components and securing them with screws.
- Assemble the bins using glue and nails or screws, ensuring there are no gaps between the components.
- Fit the top drawer and bins into their respective openings. Center them and attach the hinges and magnetic latches for easy opening and closing.
- Install pulls on the drawer and bins for added convenience.
- Make the final additions by filling all the drill holes with wood putty and sanding down any unevenness.
- Finish off the project by applying a few coats of wood stain or paint. Avoid putting any finish on the surface where the vegetables will be placed.
Conclusion
Building a vegetable bin cupboard is a rewarding DIY project that not only enhances the functionality of your kitchen but also adds a touch of elegance.
By following the steps outlined in this guide, you can create a customized storage solution that keeps your vegetables fresh and organized.
Remember to gather all the necessary materials, prepare the components, and assemble the cupboard with care.
With a little patience and hard work, you’ll have a beautiful vegetable bin cupboard that will make your kitchen more efficient and visually appealing.
Happy woodworking!